
Restauration 2CV6 Club 1980 - Démontage & suite de l'état des lieux (02 au 05/09/13)

Continuons l'état des lieux, une fois la caisse vidée:

Baie de pare-brise:
La rouille est visible des deux côtés, cette partie sera changée:


Planchers:
Les planchers avants sont bien atteints. Déjà rafistolés par un précédent propriétaire (renforts intérieurs et extérieurs), les réparations sont perforées par la rouille. Le pare-brise prenant l'eau, cette eau est restée stagner sous les tapis de sol en caoutchouc. Pour limiter l'impact, j'ai percé des trous de drainage !
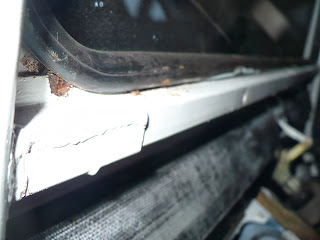
Vide poche:
Toujours lié au problème d'infiltration d'eau par le pare-brise, la tablette a pas mal rouillé au fil des années (mais rien de perforant, ouf):

Jupe arrière:
Confirmation de ce que j'avais aperçu: beaucoup de rouille sous une épaisse couche de mastic. L'ensemble méritera un gros décapage, mais seule la tôle portant les feux devra être changée:


Pour le reste, l'état général est plutôt satisfaisant, à l'image du fond de coffre:

Ou des passages de roues arrières:

La prochaine étape, ce sera décaissage et démontage de la plate-forme :-)

Comments

Popular posts from this blog

Rebuild of a Solex carburettor 26AIC

I am always keen to rework old mechanical parts, not only to satisfy my thirst for knowledge but also for the pleasure to bring back to life an old thing long forgotten. In this article, we will review a Solex carburettor 26AIC. Here is the thing: I have been happy to discover that mobile parts were not seized :D A bit of history: This carburettor was initially fitted on Renault Juvaquatre (1938-39): Photo from Lars-Göran Lindgren (Sweden)/ Wikipedia Another variant exists for Peugeot 202 , with a slight difference however: on the top, the 26AIC for the Peugeot has two holes to attach a protector on top: The Solex 26AIC has also been used on this models: Standard Flying Eight Side Valve 1938-48 Reliant 3 Wheeler Regal 1952-58 Reliant Export 1952-62 And also on industrial engines: Coventry Climax FSM2 & FSM3 Engines 1939-49 That's all for the history bit for now, the next step is to strip it down! 😄 Stripping down t...

Which controller for this project?

Here we are... What are the criteria to choose the "good" controller? - Price of the IC => this one is not a problem, those components are just so... Cheap !! Oo' - Number of pins for this project - Easy to code, as it is a first for me - Size - Availability of the coding software & kit Regarding the size, the idea is to be able to program the controller and install it on the board, or install the controller on the board and upload the code. For this reason, I do not think Arduino is a good idea. Don't get me wrong, I don't say it is not good (I am not an expert) and I should give it a try for another project, just that it does not appear the best solution to have a stand-alone controller for this project without any interface/ intermediary card. Then we have mainly two options: PIC controllers from Microchip or AVR from Atmel. After having spent a long time reading different articles, comparatives, forums, etc etc... Well... Both solutions can...

Anode driver

In this post, we will see how to build the anode driver: - principle, - basic components, - how that works, - how to calculate the proper values The anodes of the Nixie gas tubes need a driver when multiplexed in order to switch the appropriate digit. This driver is built using two transistors (1 NPN and 1 PNP) able to withstand high voltage (the Nixie tubes need 170VDC to switch on). MPSA42 (NPN) and MPSA92 (PNP) are commonly used, as they are available and cheap components. The circuit for the anode driver should be as follow: The resistor R4 is there to limit the current that flows to the Nixie. The tricky part, at least for me was to properly choose the resistors R1 to R4. Let's start with R4, obviously the easiest one. You need to know your Nixie tube characteristics: - voltage to ignite the gas in the tube, - the maximal current the gas tube needs to glow properly. and also how many digits you would multiplex with one anode driver. I have chosen c...